CONSOLE players making the transition to PC will no doubt be inundated with opinions on how a keyboard and mouse is better than a controller.
But if you’d rather stick with what you’re used to and comfortable with, it’s super easy to sync up your controller with PC or Mac.
Connecting an Xbox controller to PC
You’ve got a few options available to you when using your Xbox Wireless controller with your PC.
You can connect your controller using a USB cable, Xbox Wireless Adaptor for Windows, or Bluetooth.
USB cable
This method is the simplest; just plug one end of your USB charging cable into your controller, and the other end into the PC.
If your Windows PC isn’t detecting it, press the Xbox button on your controller to switch it back on.
Alternatively, the time-honoured unplugging and plugging it back in fix should also work.
If you’re looking to connect multiple controllers to your PC, bear in mind that you’re capped at eight. Further caveats will knock that number down even further.
If you’re using headsets with your controllers, it drops down to four. If your headsets are Xbox Stereo headsets, you’re limited to two.
Xbox Wireless
If your PC already has Xbox Wireless built in, carry on reading. If not, a trip to the shop is in order to pick up the Xbox Wireless Adaptor for Windows 10.
Using the Xbox Wireless Adaptor, plug the device into your PC and turn on your controller by pressing the Xbox button.
The button will begin to flash, so at this point, press and hold the Pair button on your Xbox Wireless Adaptor, which should prompt the red light to blink.
Press and hold the Pair button on your Xbox controller; the light will flash faster as it searches for the adaptor.
You’ll know if you’ve succeeded when the light on your Xbox controller stops flashing and remains on.
If your Windows PC has built-in Xbox Wireless, turn on your controller and press the Pair button to start searching for your PC.
On your PC, access Settings > Devices > Add Bluetooth or other device, and then select Everything Else.
You’ll be presented with a list, and you’ll want to select Xbox Wireless Controller or Xbox Elite Wireless Controller. Once you’re controller is synced, the Xbox button will stay lit up.
The same caveats apply to the number of controllers you can have connected, depending on the headsets being used.
Bluetooth
Microsoft stipulates that Bluetooth needs a PC running the Windows 10 Anniversary Update which you can find out more about here.
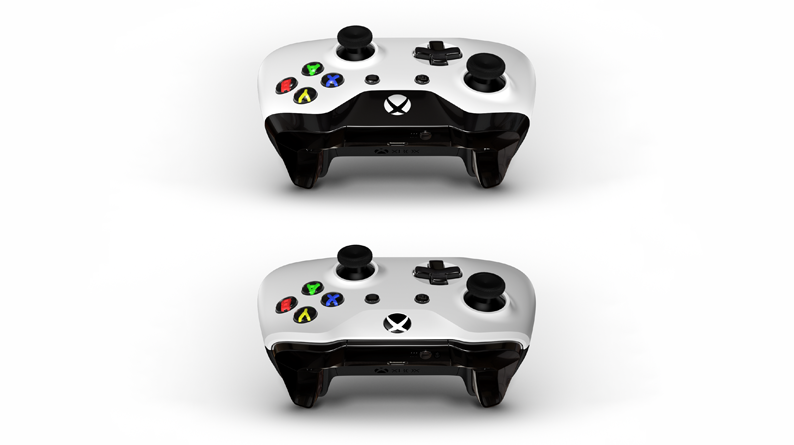
Your controller also needs to offer Bluetooth support. You can take a look at the image below to find out if yours does or not, with the bottom controller offering this feature.
In a nutshell, if the plastic around the Xbox button is part of the controller face, it has Bluetooth suppport.
If the plastic around the Xbox button is part of the top, where the bumpers are, it doesn’t support Bluetooth.
With all of that out of the way, turn on your Bluetooth-supported Xbox controller. Press and hold the Pair button to start searching for your PC.
On your PC, access Settings > Devices > Bluetooth & other devices, then turn on Bluetooth.
Select Add Bluetooth or other device > Bluetooth, and your PC will start searching for your Xbox controller.
You’ll need to choose Xbox Wireless Controller or Xbox Elite Wireless Controller, then hit Done. And you’re good to go!
Connecting an Xbox controller to Mac, iOS, Android
To connect your Xbox Wireless Controller to any other device, you’ll need to use Bluetooth. This goes for Mac, iOS, and Android devices.
First up, make sure your controller actually supports Bluetooth – it’ll look like the bottom controller in the image below.
Press and hold the Pair button on the controller and the Xbox button will start to flash.
Access the Bluetooth settings on your Mac, iOS, or Android device, and look for the Xbox Wireless Controller as a device to connect to. Select it and you’re all done.
- Read the latest stories for PS5
- Keep up-to-date with all the Xbox news
- Read the latest gaming news


